 Skip to content
Your dryer is cold, and the clothes are wet. You need a fast fix now. This guide offers a simple, temporary solution to get your dryer heating again quickly.
To temporarily repair a dryer heating element, first unplug the appliance. Then, access the heating coil, locate the break, and carefully stretch and interlock the two broken ends. This reconnects the circuit, but you should order a replacement part immediately as this is not a permanent solution[^1].
I've been in the heating element business for a long time. I know that sometimes you just need to get things working again, even if it's just for a little while. This trick is something I've shared with clients to prevent downtime while they wait for a new part. It's a practical skill. But you have to understand the risks and know that it won't last forever. Let's walk through the process safely, step by step, so you can make an informed decision and get your machine running again.
What Safety Precautions Should I Take First?
A broken appliance is frustrating. A serious injury is life-changing. You must put safety first, especially when dealing with high voltage[^2]. This is the most important step in the entire process.
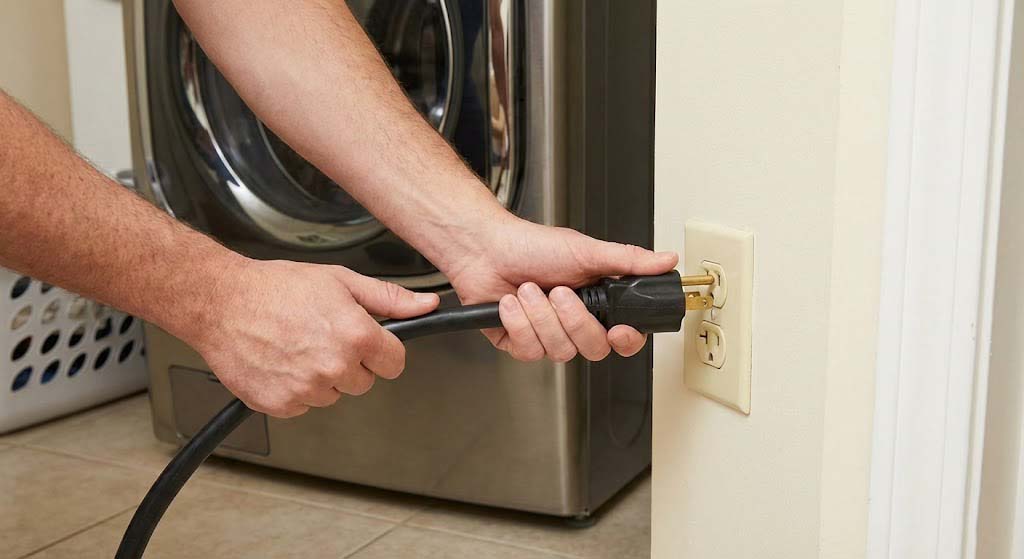
Before starting any repair, you must completely disconnect the dryer from its power source. Dryers use a 240-volt circuit, which is extremely dangerous and can be fatal. Unplug the power cord from the wall outlet. Do not just turn it off; physically disconnect it completely.
In my early days, I learned a crucial lesson: never trust a switch. Always assume a circuit is live until you have physically disconnected it yourself. The high voltage in a dryer is not forgiving. It's not like the standard 120-volt outlets in your house. A 240-volt shock can cause severe burns, heart failure, and death. It is not something to take lightly. Your personal safety is more important than a few loads of dry laundry.
Essential Safety Checklist
Before you even pick up a screwdriver, go through these steps.
| Step | Action | Reason |
|---|---|---|
| 1. Disconnect Power | Pull the dryer's power cord directly from the wall outlet. | This is the only way to be 100% sure the appliance is de-energized. |
| 2. Secure the Area | Make sure your workspace is dry and clear of clutter. | Water and electricity are a deadly combination. A clear space prevents trips and falls. |
| 3. Wear Protection | Use insulated gloves and safety glasses. | Protects your hands from sharp metal edges inside the dryer and your eyes from debris. |
| 4. Verify No Power | If you have a multimeter[^3], test the terminals where the power cord enters the dryer to confirm there is zero voltage. | This is an extra step that professionals take to be absolutely certain the machine is safe to work on. |
How Do I Access the Dryer's Heating Element?
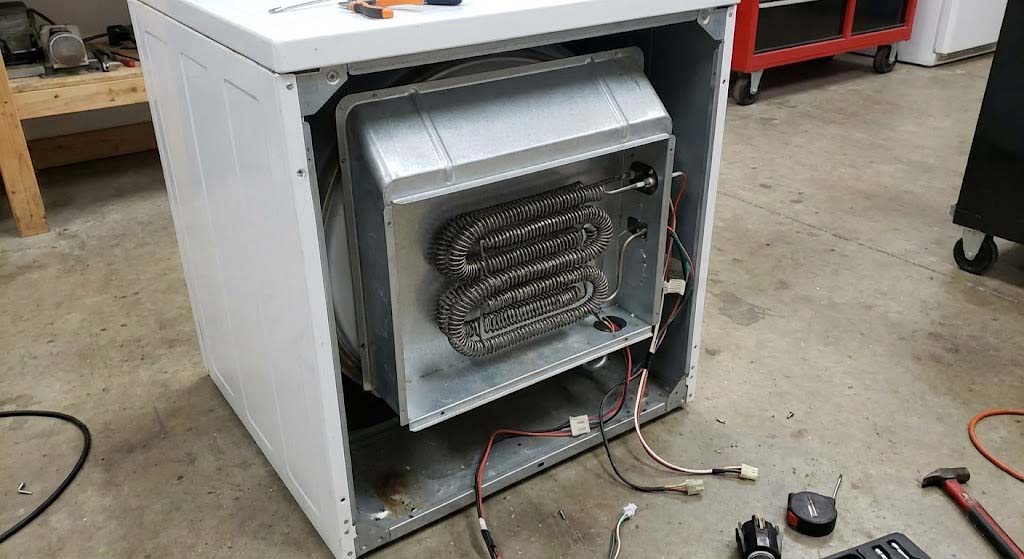
Your dryer is now safely unplugged. The next problem is getting inside. Every model is different, so this can feel like solving a puzzle. You need to get to the heating element housing.
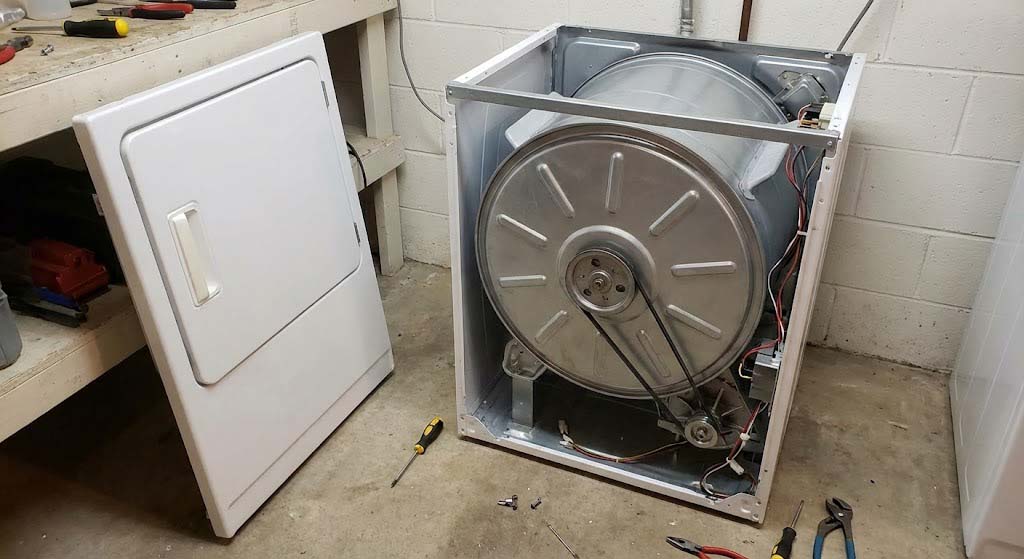
To access the heating element, you will typically need to remove either the front or back panel of the dryer. For many models, this involves removing screws, lifting the top panel, and then detaching the front panel to slide the drum out of the way.
The goal is to get a clear view of the heating element, which is usually in a metal housing at the back or bottom of the dryer cabinet. I've worked on enough machines to know there isn't one single method. I suggest looking for your dryer's model number, usually on a sticker inside the door. A quick search for "[Your Model Number] heating element replacement" will often bring up videos or diagrams. This can save you a lot of time and frustration.
Common Disassembly Steps
Most dryers follow a similar logic for disassembly. You'll likely need a Phillips head screwdriver or a nut driver.
- Remove the Top Panel: Look for screws at the back or clips in the front. Sometimes you need to slide the top forward or backward before lifting it off.
- Disconnect the Control Panel: The control panel is often attached to the top or front. Carefully disconnect any wire harnesses. Take a picture with your phone first so you remember how they go back together.
- Remove the Front Panel: With the top off, you can usually see the screws holding the front panel on. Remove them, and you may need to lift the panel off some lower clips. Be careful of any door switch wires.
- Remove the Drum: You'll likely need to release the tension on the drive belt and lift the entire drum out of the cabinet. This gives you direct access to the heating element assembly.
How Can I Identify a Broken Heating Element Coil?
You have the dryer open and the drum is out. Now you need to find the problem. You are looking for a long coil of wire inside a metal can or housing. This is your heating element.
Visually inspect the heating element coil for a physical break. The coil should be one continuous, unbroken piece. A broken element will have a clear gap or dark, burnt-looking spot where the metal has snapped. This break is what stops the flow of electricity.
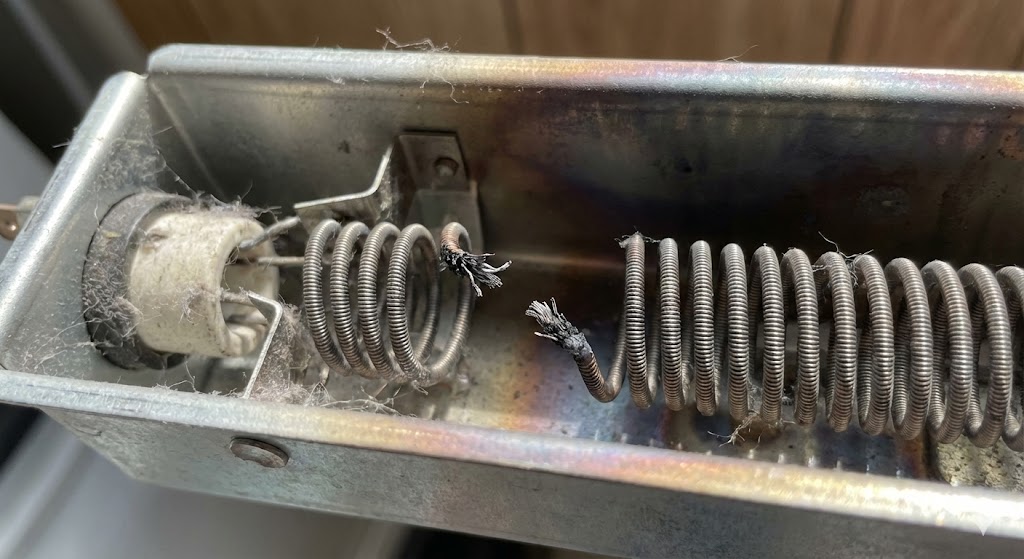
I always tell engineers that the simplest test is often the best. Before you grab any tools, just use your eyes. The Nichrome wire used in these elements becomes brittle over time with constant heating and cooling. Eventually, it just cracks. The break is usually very obvious. You will see two ends of the coil that are no longer connected. This gap is an open circuit, and electricity cannot flow through it to generate heat.
Verification Methods
If a visual check isn't conclusive, you can use a tool for certainty.
- Visual Inspection: This is your primary method. Look closely along the entire length of the coil. The break point might be discolored from arcing when it failed. If the coil is stretched or sagging badly in one spot, that's also a sign of an impending failure.
- Continuity Test: For a more technical confirmation, you can use a multimeter. Disconnect the two wires leading to the heating element terminals. Set your multimeter to the continuity setting (it often has a sound symbol). Touch one probe to each terminal.
- Good Element: If you hear a beep, it means the circuit is complete. The element is electrically fine.
- Bad Element: If there is no beep, there is a break somewhere in the coil. The element has failed and needs replacement or, in our case, a temporary repair[^4].
What's a Quick, Temporary Fix for a Broken Coil?
You have found the break. Now for the temporary fix. This method works by re-establishing the electrical path. It is a mechanical solution to an electrical problem, but it works in an emergency.
Gently stretch the coil on both sides of the break. Overlap the two stretched ends by about an inch. Then, carefully mesh them together as if you were screwing one spring into the other. This mechanical connection[^5] will complete the electrical circuit again, temporarily.
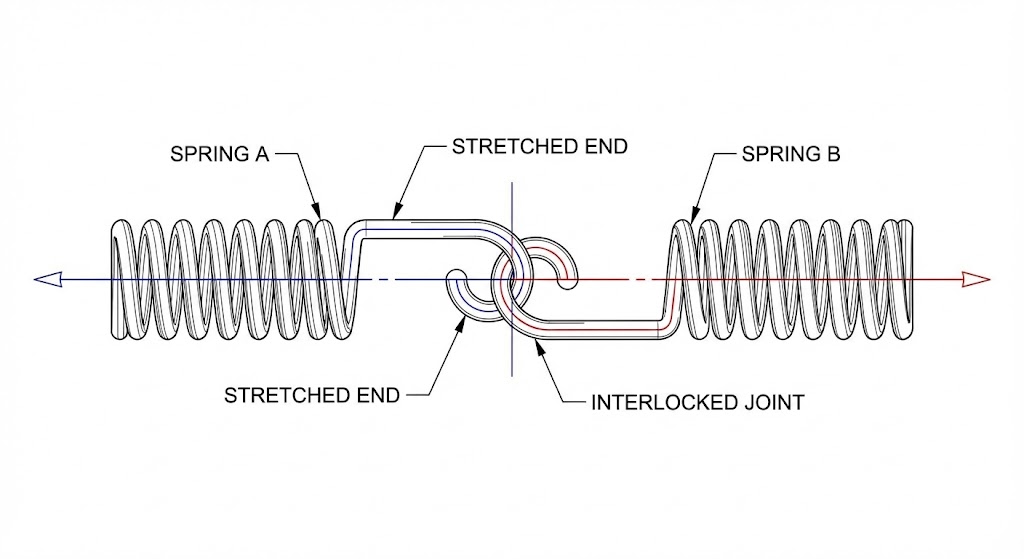
Think of it like this: the electricity needs a continuous bridge to travel across. The break is a collapsed bridge. By stretching and interlocking the ends, you are building a crude, temporary replacement bridge. I have used this technique to get critical equipment running while waiting for a part. It is not an elegant solution, but it is effective. The key is to create a tight mechanical connection. A loose connection will arc, create too much heat, and fail almost immediately.
Step-by-Step Temporary Repair
Be gentle during this process. The old coil wire can be brittle.
- Isolate the Break: Make sure you have clear access to the two broken ends of the coil.
- Gently Stretch: Using needle-nose pliers, carefully grab the coil about two inches from one side of the break. Gently pull to stretch about an inch of the coil, slightly increasing the space between the windings. Repeat on the other side of the break.
- Overlap and Mesh: Push the two stretched ends toward each other so they overlap. Now, twist and push them together. The goal is to interlock the windings of each end, like screwing two small springs together. The connection should feel snug and secure.
- Check the Connection: The repaired section should be tight. It will look like a thicker, denser part of the coil. Make sure no parts of the repaired section are touching the metal housing.
Why Is This Repair Only a Temporary Solution?
You have reassembled the dryer, and it is now producing heat. This is great, but I must be very clear about this next part. You have not fixed the element; you have only bypassed the failure for a short time.
This repair is temporary because the altered section has a lower electrical resistance[^6]. This causes it to get much hotter than the rest of the coil, creating a "hot spot[^7]." This intense heat will quickly degrade the wire, causing it to break again, usually within a few weeks.
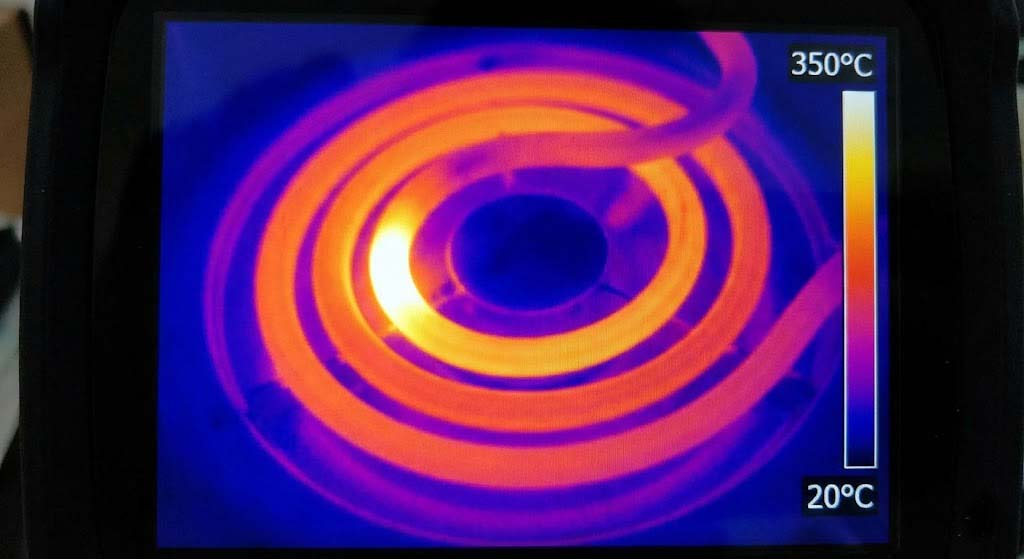
Let me explain the science in simple terms. A heating element works by resisting the flow of electricity, which generates heat. The length and thickness of the wire are designed to create a specific resistance to heat evenly. When you overlap the coil, you are essentially shortening the total length of the wire and making that section thicker. Less resistance in that spot means more current flows through it. According to Ohm's law and Joule's first law, this increased current in a smaller area results in a rapid and intense temperature increase. This hot spot will be the new point of failure. It's not a question of if it will fail, but when. I always tell my clients to order a new element the same day they do this repair.
Reasons for Inevitable Failure
| Factor | Description | Outcome |
|---|---|---|
| Altered Resistance | The overlapped section is a parallel path, lowering local resistance. | Creates an intense "hot spot" that operates beyond the wire's design temperature. |
| Material Stress | The wire has already been stressed by thousands of heating/cooling cycles, making it brittle. | The hot spot accelerates this degradation process, leading to rapid material failure. |
| Reduced Airflow | The denser, repaired section can slightly impede airflow, further increasing its temperature. | The coil cannot shed heat effectively at the repair point, hastening its burnout. |
Conclusion
This temporary fix can get your dryer working in an emergency. Always prioritize safety by unplugging the unit. But remember, this is a short-term patch, not a permanent repair.
[^1]: Explore effective long-term solutions to ensure your dryer operates efficiently. [^2]: Understand the risks associated with high voltage to ensure your safety during repairs. [^3]: Understand how to use a multimeter to troubleshoot electrical issues in your appliances. [^4]: Explore various temporary repair techniques that can save you time and money while waiting for permanent solutions. [^5]: Understand the importance of mechanical connections in ensuring electrical continuity. [^6]: Gain insights into electrical resistance and its role in appliance functionality. [^7]: Discover the implications of hot spots in electrical systems and how to avoid them.
