 Skip to content
Installing cartridge heaters seems simple, but getting it wrong wastes energy and shortens life fast. Are you making common mistakes that lead to costly downtime and frequent replacements?
Proper cartridge heater installation means making sure heat flows effectively from the heater to your application, not backward into the jacket or air. This prevents premature failure and ensures maximum operational life and efficiency for your heating system.
 )
)
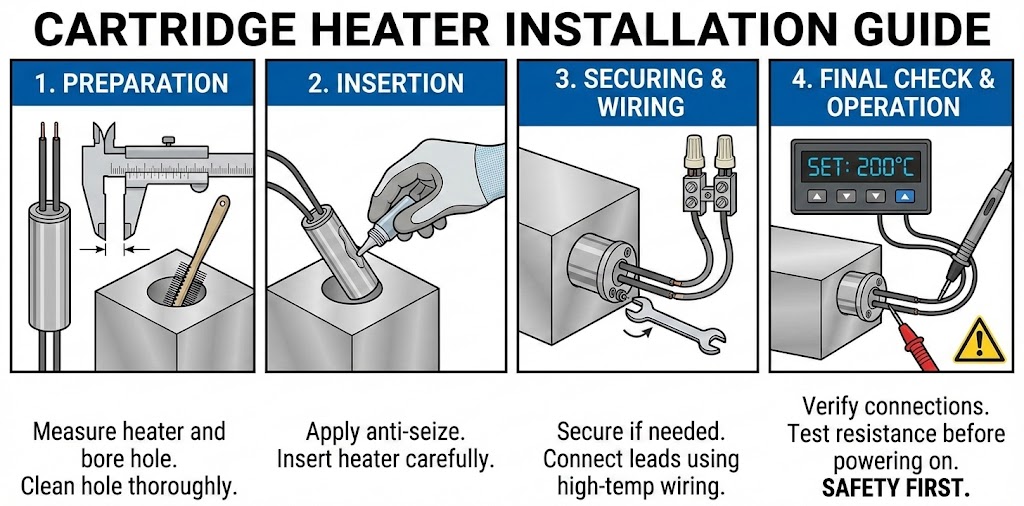
In my 20 years on the production line, in the field, and doing failure analysis, I have seen many ways cartridge heaters fail. Many people treat them as simple plug-and-play parts. But I see them more like an implanted component. Install it right, and it lasts ten years. Install it poorly, and it can fail in three days. I have condensed my experience into one guiding principle and five key elements that you can use right away.
0.05 mm Gap = 10 Years Life: The Invisible Clearance That Makes or Breaks a Cartridge Heater?
Have you ever wondered why some cartridge heaters last forever, while others burn out quickly, even with the same power? The tiny space between the heater and its hole often holds the secret to long life or early failure.
A gap larger than 0.05 mm between the cartridge heater and its mounting hole can drastically reduce its lifespan by causing localized overheating. Keeping this clearance minimal ensures efficient heat transfer and prevents premature burnout.
 )
)
I have often seen situations where a cartridge heater failed too soon. Many times, the problem was a gap that was too big. Air is a poor conductor of heat. Even a small air gap creates a thermal barrier. My tests show that a 0.10 mm air gap can increase the tube surface temperature by an extra 30–40 °C. This extra heat cuts the heater's life in half. You must ensure the hole is made with high precision. This is not just about making a hole. It is about making a precise interface.
Hole Preparation and Tolerances
To get this critical small gap, the way you prepare the hole is very important.
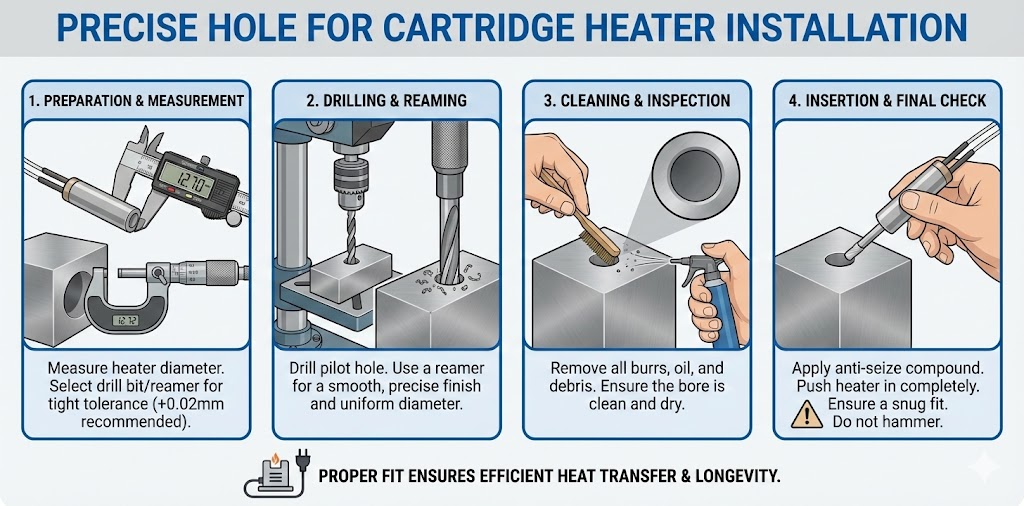
- Drilling and Reaming: You should drill the hole and then ream it in one step. This makes sure the surface finish (Ra) is smooth, usually less than 1.6 µm. A rough surface can trap air or create uneven contact points.
- Hole and Tube Tolerances: The hole diameter should follow H7 tolerance. The heater tube diameter should follow g6 tolerance. This combination gives a smooth fit with a clearance between 0.02 mm and 0.05 mm. This small clearance ensures good thermal contact.
- Batch Production: For high-volume production, using a "gun drill" followed by "squeeze honing" is best. This method makes sure the hole is very straight (concentricity within 0.02 mm). It also prevents the hole from becoming oval, which would create uneven gaps.
This careful attention to detail in hole preparation means heat moves from the heater to the heated body quickly. It avoids hot spots that lead to early failure.
| Feature | Specification | Benefit |
|---|---|---|
| Surface Finish (Ra) | ≤ 1.6 µm | Reduces air pockets, improves contact |
| Hole Diameter | H7 Tolerance | Standard for precise fitting |
| Tube Diameter | g6 Tolerance | Ensures 0.02-0.05 mm transition fit |
| Concentricity | Within 0.02 mm (with gun drill/squeeze honing) | Prevents oval holes, ensures even gap |
Stop Bottoming-Out! The 3 mm Stand-Off Rule for Single-Head Heaters?
It is easy to push a cartridge heater all the way to the bottom of its mounting hole. But this common mistake often leads to hot spots and poor performance. Are you sure your heater is truly effective along its full length?
You should embed a cartridge heater with a 3 mm standoff from the very bottom of the hole. This ensures that the active heating element fully contacts the heated body and allows for an essential air gap at the end for gas to escape, preventing dangerous localized overheating.
 )
)
I have often seen heaters pushed all the way to the bottom of a blind hole. This seems logical to make sure it is fully inserted. But this usually leaves a "dead zone" of about 5 mm at the hot end that does not transfer heat well. This happens because the active heating coil often ends a few millimeters from the heater tip. Pushing it to the bottom creates a trapped air pocket. This air cannot escape when the heater expands, causing an insulating layer. This means poor heat transfer where you need it most. It also leads to local overheating, which can quickly damage the heater.
Correct Embedment for Optimal Heat Transfer
Getting the depth right is very important for the heater to work well and last long.
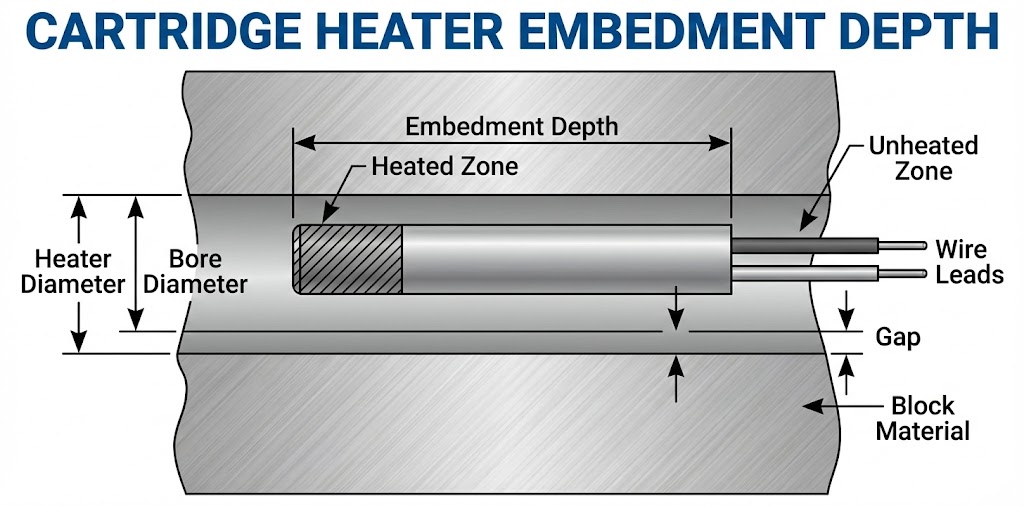
- Theoretical Embedment Depth: The correct depth for embedding the heater should be equal to its effective heating length plus an extra 3 mm margin. This margin ensures that the hottest part of the heater is fully inside the heated material. It also accounts for slight variations in manufacturing.
- Hole Depth for Air Gap: You must add an extra 5 mm to the hole depth beyond the theoretical embedment. This extra space creates an air gap at the very bottom. This gap is vital. It allows air to escape as the heater expands during heating cycles. Without this escape path, air gets trapped and forms a "gas plug." This gas plug acts as an insulator, which causes local overheating at the heater tip. I have seen many failures where this simple air gap was missed. It led to early heater burnout, even when other installation steps were correct.
Following these rules means your heater will transfer heat efficiently along its full active length. It will avoid localized hot spots that shorten its life. This small detail greatly improves performance and durability.
Forget Price—Pick the Right Paste: Why BN Grease Beats Silver at 600 °C?
When choosing a thermal filler for your cartridge heater, do you just pick the cheapest one or what is readily available? Using the wrong thermal paste can severely limit your heater's performance and lifespan, no matter its quality.
You must select a thermal paste based on the heater's operating temperature, not its price. Boron Nitride (BN) thermal paste works well below 600 °C. Above that, you need more advanced solutions like Aluminum Nitride to ensure efficient heat transfer and long-term reliability.
 )
)
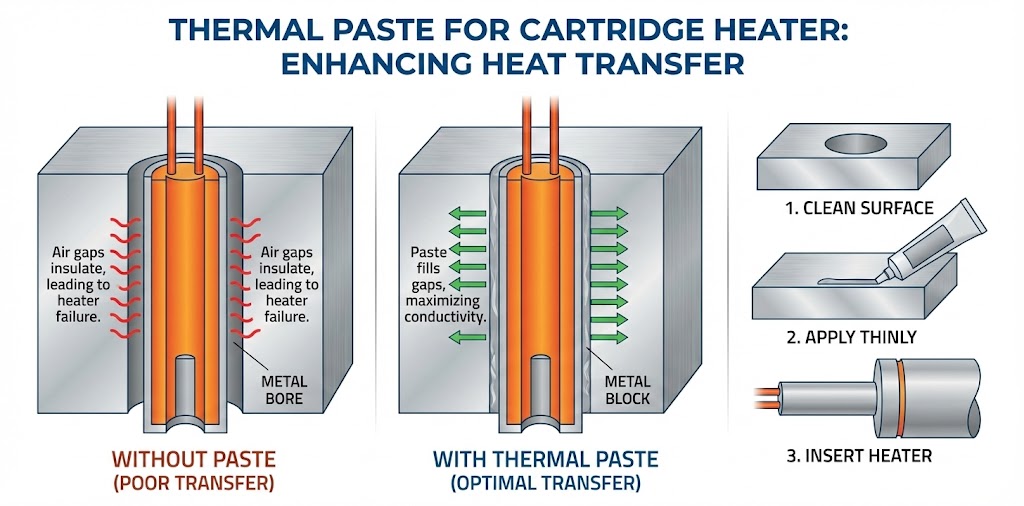
In my work at ELEKHEAT, I have often seen customers use the wrong thermal paste. They think all thermal compounds are the same. But choosing the right paste is crucial. It is not about how expensive the paste is. It is about how well it performs at your specific operating temperature. A paste that works well at 200 °C will fail miserably at 600 °C. This leads to inefficient heating and premature heater failure. The paste fills the tiny gaps and helps heat move from the heater to the heated part. If the paste breaks down, those gaps fill with air or residues, making the heater run hotter than it should.
Choosing the Correct Thermal Filling Material
The right thermal paste ensures efficient heat transfer and extends the heater’s life.
- Up to 600 °C: For temperatures below 600 °C, I recommend 50 nm Boron Nitride (BN) thermal paste. It has a thermal conductivity of 3–5 W·m⁻¹·K⁻¹. It is also easy to clean. BN paste maintains its properties well within this range.
- 600–750 °C: For higher temperatures, between 600 °C and 750 °C, you need more robust solutions. I suggest using a copper-plated or nickel-plated tube body with Aluminum Nitride (AlN) dry powder injection. This setup can achieve a thermal conductivity of over 20 W·m⁻¹·K⁻¹. AlN offers excellent high-temperature stability.
- Materials to Avoid: You must never use common silicone grease for temperatures above 200 °C. It will evaporate and leave insulating gaps. Also, avoid silver paste. It can cause electrochemical migration at high temperatures. Graphite sheets are also not good. They can become brittle and flake, leading to poor contact over time. My experience shows these mistakes cause many heater failures.
Choosing the right thermal filler ensures that heat moves effectively from the heater to your material. It is a small choice that makes a big difference in performance and longevity.
| Temperature Range | Recommended Filler | Thermal Conductivity | Notes |
|---|---|---|---|
| Up to 600 °C | 50 nm Boron Nitride (BN) paste | 3–5 W·m⁻¹·K⁻¹ | Easy to clean, stable. |
| 600–750 °C | Plated tube + Aluminum Nitride (AlN) | > 20 W·m⁻¹·K⁻¹ | Excellent high-temperature stability, dry powder injection. |
| Avoid Above 200 °C | Common Silicone Grease | Variable | Evaporates, leaves insulating gaps. |
| Avoid (High Temp) | Silver Paste | High, but problematic | Electrochemical migration risk. |
| Avoid (High Temp) | Graphite Sheets | Good, but mechanically weak | Brittle, flakes, poor long-term contact. |
Clamp Radially, Float Axially: Thermal Breathing Room for Cartridge Heaters?
Heaters expand when they get hot and shrink when they cool down. If you do not allow for this movement, it can put stress on the heater and lead to early failure. Are you giving your cartridge heater the "breathing room" it needs while keeping it firmly in place?
You must clamp cartridge heaters radially to maintain tight thermal contact, but allow them to float axially. This "breathing room" accommodates thermal expansion and contraction, preventing bending or cracking of the heater element and ensuring its long-term reliability.
 )
)
I have seen many cartridge heaters fail because they were either too loose or too tightly fixed in the wrong way. The problem comes from thermal expansion. When the heater gets hot, it expands. When it cools, it contracts. If the heater is clamped too rigidly in the axial direction, this expansion can cause serious stress. It can bend the heater or even crack the weld joints. If it is too loose radially, heat transfer is poor. It is a balance between keeping good contact for heat transfer and allowing for natural movement.
Managing Thermal Expansion and Contraction
Proper mounting involves two key actions: radial clamping and axial floating.
- Radial Clamping: This means holding the heater tightly around its circumference. You can use segmented spring sleeves or copper corrugated sleeves. These solutions ensure the heater maintains a gap of 0.05 mm or less, even as it expands and contracts. The sleeves press the heater against the hole wall, improving thermal contact. This allows heat to move efficiently from the heater to the heated body. Without this tight radial contact, air gaps can form, and efficiency drops.
- Axial Floating: At the same time, you must allow the heater to move slightly along its length. I recommend leaving about 1 mm of float at the tail end of the heater. This small amount of free movement prevents the heater from being bent or its weld joints from cracking. This is important when the equipment itself also expands with heat, even by a small amount like 100 microstrains (µε). If the heater cannot expand freely, the stress builds up. This stress can cause mechanical damage. It leads to early failure of the heater, often at the most critical points like lead wire connections.
By doing these two things, you make sure the heater stays in good thermal contact but can also handle the natural forces of heating and cooling. This extends its life and prevents common failures.
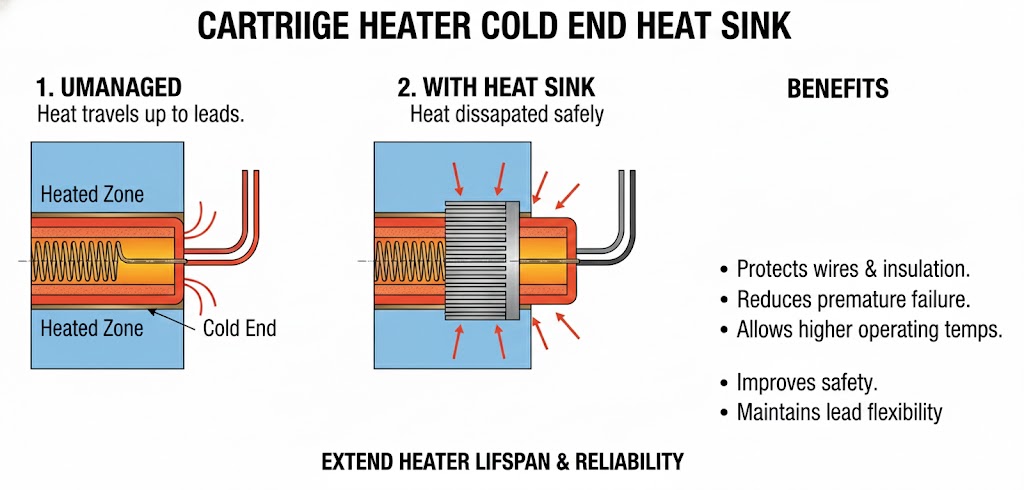
Keep the Cold End Below 180 °C: One Heat-Sink Collar Cuts Failure from 5 ‰ to 50 ppm?
Do you know that the "cold end" of your cartridge heater is often where problems begin? Many heaters fail not because of the hot section, but because of overheating at the part you might not even think about.
You must keep the cold end of a cartridge heater below 180 °C to prevent premature failure. Adding a simple 10 mm thick aluminum bronze heat-sink collar to the jacket tail can significantly reduce cold end temperatures, cutting failure rates from 5 per mille to as low as 50 parts per million.
 )
)
I have analyzed many failed cartridge heaters. About 30% of early heater failures happen because the "cold end" gets too hot. This part is where the lead wires exit the heater. When the cold end overheats, the magnesium oxide (MgO) insulation inside the heater can absorb moisture. This moisture lowers the electrical insulation resistance. It can lead to shorts, ground faults, or outright heater failure. People often focus on the hot end, but neglecting the cold end is a big mistake. Preventing this cold end overheating is a simple yet powerful way to extend heater life significantly.
Preventing Cold End Overheating
There are two effective ways to manage the cold end temperature.
- Adding a Heat-Sink Collar: The most effective method is to add a 10 mm thick aluminum bronze heat-sink collar to the tail end of the heater jacket. Aluminum bronze is good at conducting heat. This collar acts as a "thermal bridge." It draws heat away from the cold end of the heater. My data shows that this can reduce the cold end temperature to below 180 °C. This temperature control stops the MgO from absorbing moisture. It maintains the heater's insulation integrity. This simple addition can drastically cut failure rates. I have seen it drop from 5 per mille (5 failures per 1,000 heaters) to 50 parts per million (50 failures per 1,000,000 heaters). This is a huge improvement in reliability.
- Lead Wire Orientation: You should also angle the lead wire exit downwards by 30 degrees. This small adjustment helps prevent hot air from rising and getting trapped around the lead wires. If hot air gets trapped, it creates a small convection current that heats the cold end even more. Directing the wires downwards helps to dissipate heat.
By using these strategies, you protect the most vulnerable part of the cartridge heater. This ensures a much longer and more reliable operation.
Conclusion
Installing a cartridge heater correctly is not just about putting it in a hole. It means treating it as a precise thermal interface. Following these five key steps ensures heat moves efficiently. This helps your heaters last longer and perform better, saving you money and downtime.