Skip to content
Water Heater Element Replacement Cost (2025 Guide)
If your shower suddenly turns lukewarm—or stone cold—there’s a good chance the water heater element is calling it quits.
Updated 2025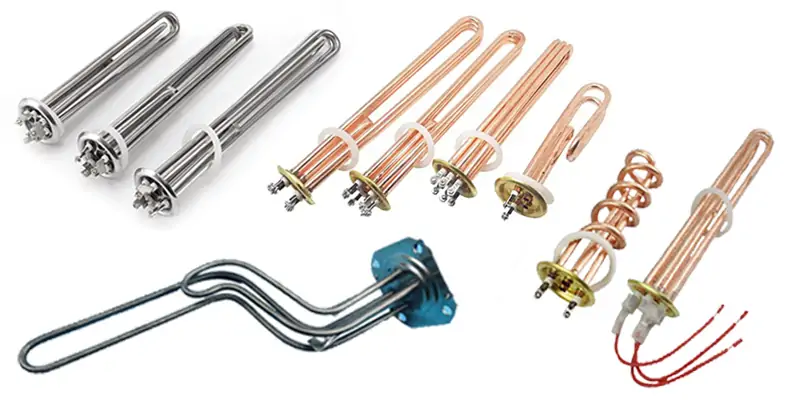
Think of the element like a toaster coil inside the tank: electricity runs through it, it gets hot, and the water warms up. When it fails, you’re paying to heat water that never gets hot. This guide breaks down what it costs to replace a water heater element, what affects the price, and how to decide between DIY and hiring a pro. We’ll also cover safety, step-by-step replacement, and money-saving tactics.
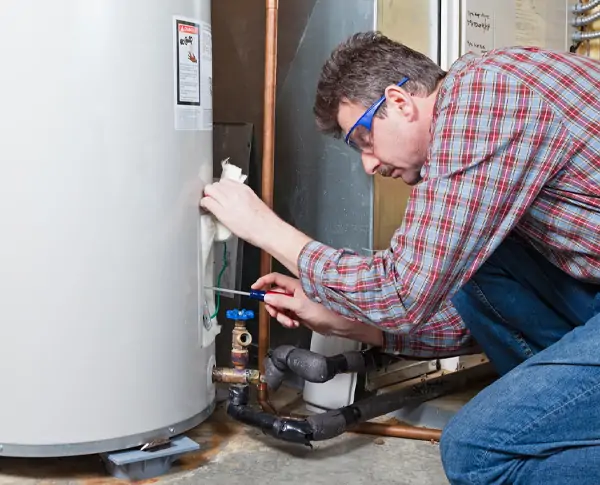
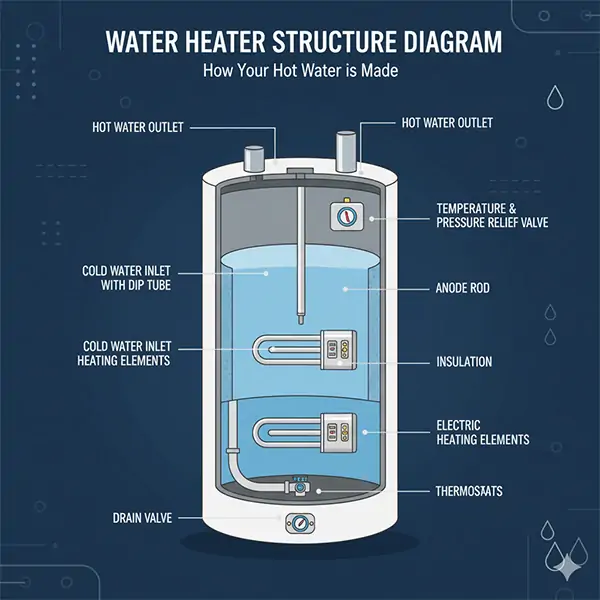
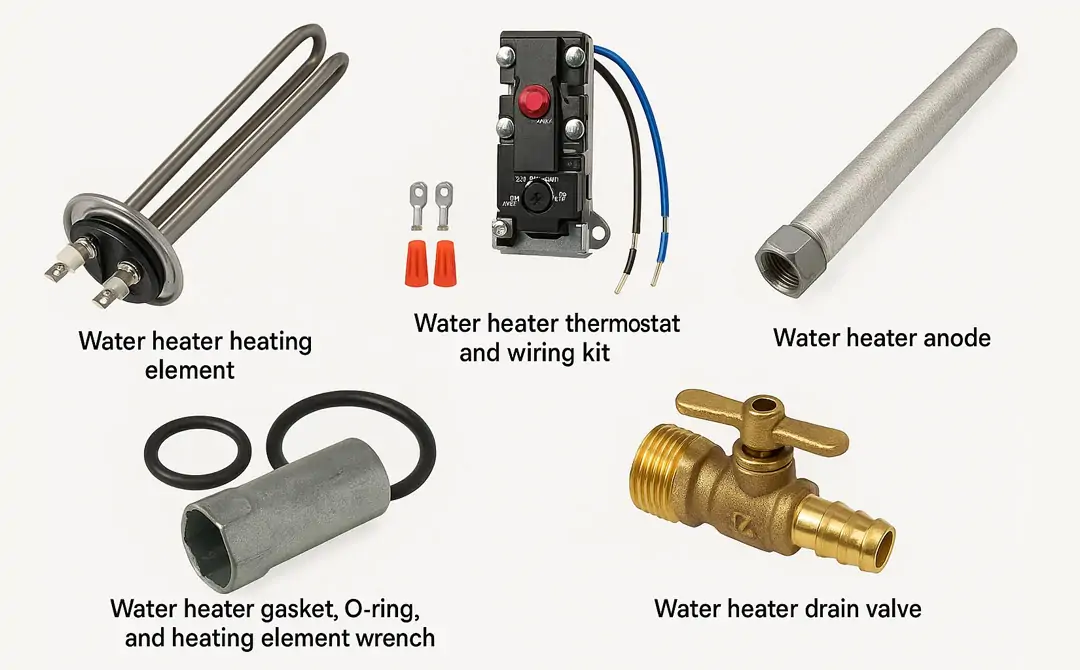
What Is a Water Heater Element?
A water heater element is a metal rod (copper, stainless, or Incoloy alloy) that screws into the tank. When powered, it heats like a stove coil to warm the surrounding water. Most 30–80-gallon electric tanks have two elements—upper and lower—managed by separate thermostats. They “take turns” so your wiring and breaker aren’t overloaded.
Do You Need a New Element? Signs & Tests
Common Symptoms
- No hot water at all
- Lukewarm water or hot water that runs out fast
- Breaker tripping repeatedly
- Popping/crackling sounds (often heavy sediment)
Quick Checks (Before Buying Parts)
- Breaker: Make sure the water-heater breaker is ON and not tripped.
- Reset (high-limit) button: With power OFF and the upper access panel open, press the red reset on the upper thermostat; if it was tripped, you may get heat again. If it keeps tripping, diagnose further—don’t keep pressing it.
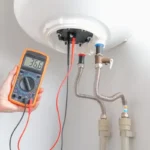
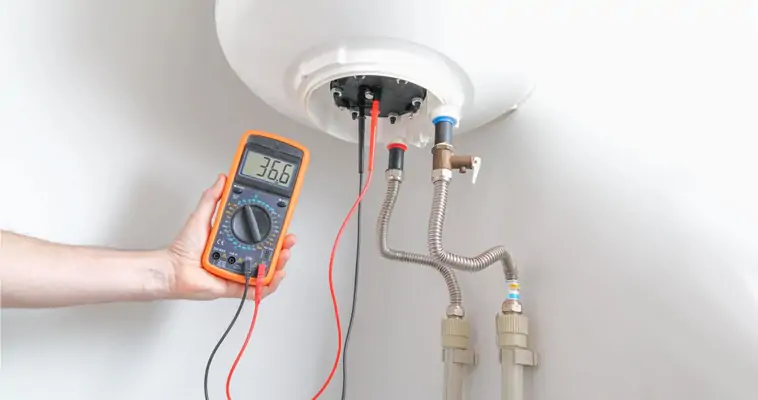
Simple Multimeter Test
- Power OFF at the breaker and verify no voltage with a non-contact tester.
- Remove the access panel/insulation, expose the element screws, and disconnect the two wires.
- Set your meter to ohms (Ω). Touch one probe to each screw.
- Good element: typically ~10–30 Ω (varies by wattage).
- Bad element: open (no reading/infinite).
Average Replacement Cost (DIY vs. Pro)
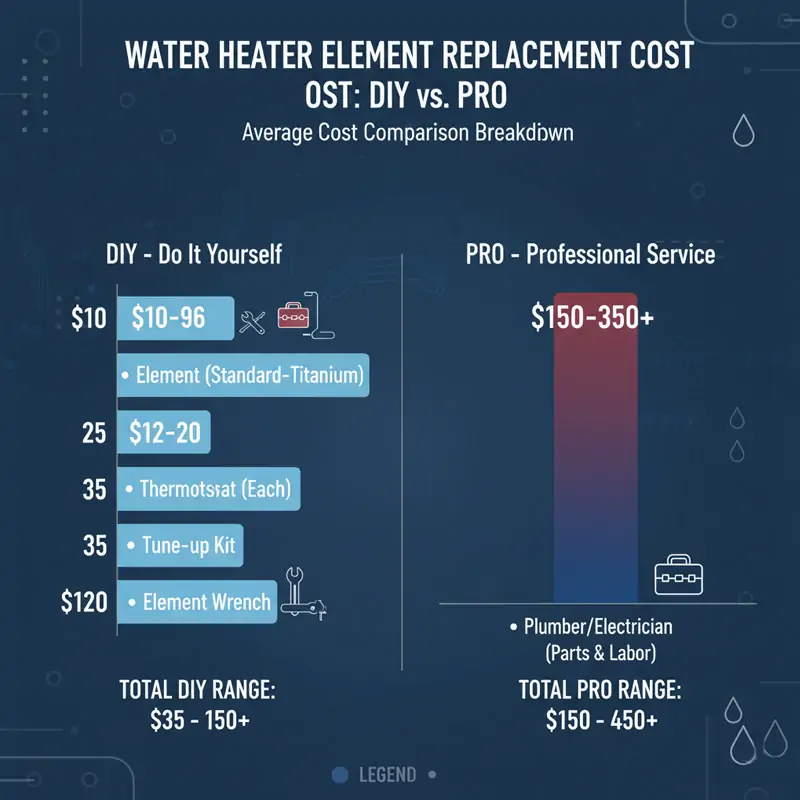
Typical DIY Cost Range
- Element only: $10–$20 (standard 240V screw-in); $18–$20 (low-watt-density Incoloy); $55–$96 (specialty titanium, e.g., Marathon).
- Thermostat (each): about $12–$20.
- Tune-up kit: (~2 elements + 2 thermostats + wrench) ~$35.
- Element wrench: ~$10–$20.
Typical Professional Cost Range
A straightforward single-element swap by a plumber or electrician usually lands between $150–$350, parts and labor. Local rates, trip minimums, and after-hours surcharges can push it higher.
Cost Factors You Should Know
Element Type & Material
- Copper: lowest cost; fine for soft water.
- Stainless/Incoloy: better in hard water (resists scale/corrosion) and often chosen as upgrades.
Wattage, Voltage & Watt Density
- Match voltage and wattage to the heater’s nameplate.
- Low-watt-density elements reduce scaling and can extend life in hard water.
Heater Style
- Single vs. dual element: Dual-element tanks are standard.
- Hybrid/heat-pump: use backup elements; OEM titanium may cost more.
- Electric tankless: heating modules/elements cost more and take longer to service.
Labor Rates, Trip Fees & Minimums
Expect hourly rates around $105/hr on average. Emergency calls can jump to ~$350/hr, and some companies add trip fees (~$225).
Emergency/After-hours Surcharges
Night/weekend calls or “no hot water today” requests bring premiums. If you can wait until regular hours, you’ll usually save.
Access, Sediment, and Code Issues
Tight closets, stuck elements, or heavy sediment can add time. Sediment also ruins elements early—regular flushing helps.
Warranty and Permit Considerations
Using the wrong wattage or wiring outside code can void warranties. Element swaps usually don’t require permits, but full replacements often do—check locally.
Regional Price Differences
Major metros typically have higher labor and service minimums; rural markets can be lower.
Parts & Price Breakdown
Heating Element (By Type)
- Standard screw-in (4500–5500W): $10–$20
- Low-watt-density (Incoloy): $18–$20
- Titanium/OEM (Marathon, etc.): $55–$96
Thermostat & Wiring Kits
- Lower/upper thermostat: $12–$20 each
- Tune-up kit: (~2 elements + 2 thermostats + wrench) ~$35
Gaskets, O-rings & Element Wrench
- Gasket is usually included; replacements are a few dollars.
- Element wrench or 1-1/2" socket: ~$10–$20.
Optional While You’re There
- Anode rod: ~$23–$40
- Drain valve (brass): ~$16–$32
DIY or Hire a Pro?
When DIY Is Reasonable
- You’re comfortable turning off power/water and using a multimeter.
- The heater is easy to access, and the element isn’t badly seized.
- You follow a lock-out/tag-out routine and verify no voltage.
When to Call a Pro
- You’re unsure about electrical safety or meter use.
- Wires look damaged, terminals are burned, or the element is frozen in place.
- You have a hybrid or electric tankless unit needing OEM parts/warranty service.
Safety Risks & Liability
Electric heaters use 240V—serious shock risk. Manufacturers require proper filling, grounding, and code-compliant wiring to avoid damage and warranty issues.
Warranty Impacts
Using wrong-spec parts, running the tank dry, or incorrect wiring can void coverage. Keep receipts and note the model/serial.
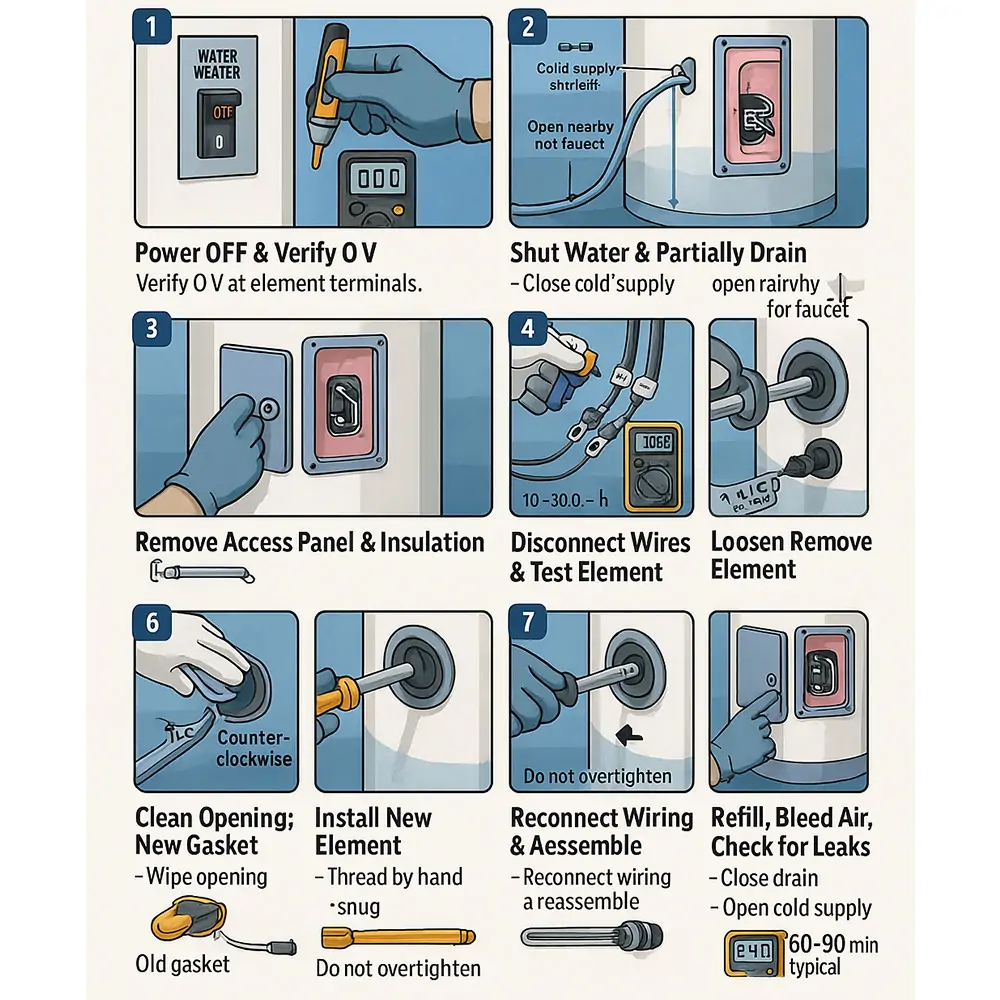
How to Replace a Water Heater Element (Step-by-Step)
Safety first: Turn OFF the breaker and verify no voltage at the element with a non-contact tester and multimeter before you touch anything. If any step feels beyond your comfort, stop and call a pro.
Power Off & Verify No Voltage
At the main panel, switch off the water-heater breaker. Confirm wires are dead with a tester.
Shut Water & Partially Drain Tank
Close the cold supply. Attach a garden hose to the drain valve. Drain until water level falls below the element opening.
Remove Access Panels, Insulation & Thermostat Cover
Take off the metal panel, peel back insulation, and remove the plastic thermostat shield.
Disconnect Wires & Test the Element
Label or photo the wires, then remove them. Test resistance across the element screws (~10–30 Ω = good; open = bad).
Loosen and Remove the Element
Use a 1-1/2" socket/element wrench to turn counterclockwise. Remove the old gasket.
Clean Opening; Install New Gasket
Wipe the tank surface clean so the new gasket seals well.
Install New Element & Torque Snugly
Thread in by hand, then snug with the wrench—firm, but don’t over-torque.
Reconnect Wiring & Reassemble Covers
Reconnect the two wires to the element screws and tighten. Reinstall covers/insulation.
Refill, Bleed Air & Check for Leaks
Close the drain, open the cold supply, and open a nearby hot faucet for several minutes to purge air. Inspect the gasket for weeping. Never power a dry tank.
Restore Power; Confirm Recovery Time
Turn the breaker back on. Most 40–50-gallon electric tanks need roughly 60–90 minutes to fully reheat after a cold start.
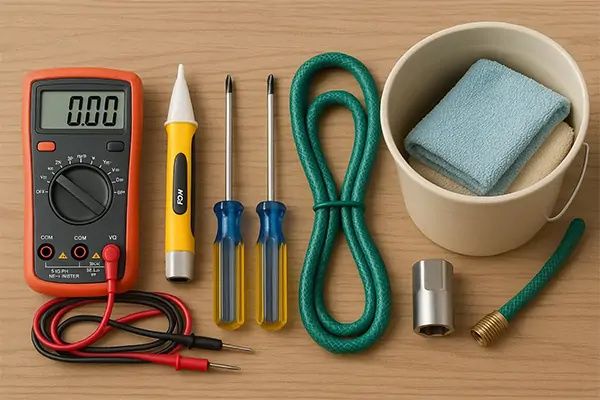
Tools & Materials Checklist
Tools
- Multimeter and non-contact voltage tester
- Screwdrivers (Phillips/flat)
- 1-1/2" element socket or element wrench
- Garden hose and bucket/towels
Parts
- Replacement water heater element (match wattage/voltage/shape)
- New gasket (often included)
- Optional: thermostat(s) or tune-up kit
Safety Gear
- Insulated gloves, eye protection
- Lock-out/tag-out reminder at the breaker
How Long Does It Take?
- DIY working time: ~1–2 hours (plus cooling, draining, and refill).
- Pro service: Often completed in a standard service window (diagnosis + replacement).
Choosing the Right Replacement Element
Match Voltage & Wattage to Nameplate
Check the heater’s data plate and match voltage (often 240V) and wattage (e.g., 4500W). Using the wrong wattage can trip breakers or damage wiring.
Fold-back vs. Straight Elements
Fold-back designs fit tighter tanks and offer more surface area; straight elements are common on larger tanks. Match the original style for best fit.
Low-watt-density vs. High-density
Low-watt-density elements run cooler per square inch, which helps reduce scale in hard water and can extend life.
Material Durability & Hard-water Fit
Incoloy and titanium elements resist corrosion and are a smart upgrade if you have hard water.
When Repair Isn’t Worth It
Tank Age & Efficiency Thresholds
If your tank is 8–12 years old, frequent repairs may not pay off—consider replacement (especially if efficiency is slipping).
Tank Leaks vs. Fixable Parts
A leaking tank is not fixable; replace the heater. (Elements, thermostats, valves are replaceable.)
Repeated Trips/Thermostat Issues
Chronic high-limit trips or scorched wiring can signal deeper problems; get a pro to assess.
Compare with Full Replacement Costs
A full water-heater replacement often runs $600–$3,500+ depending on type and size. Heat-pump and tankless systems cost more up front but can save energy.
Real-World Cost Scenarios
Single Element Swap (Standard Call)
- Element $15–$20 + gasket
- Labor $120–$200 (~1–2 hrs)
- Total: $150–$300 (no emergencies)
Both Elements Replaced + Thermostat
- 2 elements + 2 thermostats (kit) ~$35
- Labor $200–$300
- Total: $235–$400
Hybrid/Heat-pump Backup Element Service
- OEM titanium element $55–$96
- Labor typically higher (more panels/diagnostics)
- Total: $250–$450+
Electric Tankless Module Replacement
- Heating elements/modules $70–$150 (brand-specific)
- Labor $150–$300+ (diagnosis + teardown)
- Total: $250–$500+
Weekend Emergency Visit
- Add after-hours rates (often ~$350/hr) and/or trip fee (~$225).
- Total can exceed $400–$700 for the same work.
Money-Saving Tips
- Bundle maintenance: ask the tech to flush the tank and check the anode rod while there.
- Shop parts smartly: match OEM specs; tune-up kits can be cost-effective.
- Schedule non-emergency visits: avoid weekend/after-hours premiums.
- Check rebates & warranties: compare repair vs. upgrading to a heat-pump water heater.
Frequently Asked Questions
Do upper and lower elements cost the same to replace?
Usually, yes—both are similar price if they’re standard screw-in parts. Specialty/OEM elements can vary.
Can I run the heater with only one working element?
Often you’ll still get some hot water, but recovery will be slower and capacity feels smaller.
Why do elements fail early in hard-water homes?
Mineral scale insulates the element, causing hot spots and burnout. Low-watt-density Incoloy or titanium elements resist this better.
Do I need to drain the whole tank to replace an element?
No. Drain only until the water level drops below the element. Refill fully before restoring power.
Should I replace the thermostat at the same time?
If one element failed on an older heater—or you’ve had temperature issues—consider a tune-up kit (both elements + both thermostats).
What’s the typical lifespan of a new element?
Many last 6–10 years, depending on water quality and maintenance.
How soon will I have hot water again after replacement?
From a cold start, plan on ~60–90 minutes for a typical 40-gallon, 4500W electric tank to recover.
Bottom Line
- DIY parts are cheap (often $15–$60 for the element); a pro job typically lands in the $150–$350 range.
- Match voltage/wattage to your nameplate, use low-watt-density in hard water, and consider a tune-up kit.
- If the tank is old (8–12 years) or leaking, compare repair to full replacement—and check for heat-pump rebates if upgrading.