 Skip to content
 Quick Answer: Selecting the right cartridge heater takes just three steps —
① Confirm the mounting hole diameter and heated length (recommended tolerance +0.01mm~+0.05mm);
② Calculate the required power based on the target object and heat-up time (for molds, typical 2–4 W/cm² low power density or 15–30 W/cm² high power density);
③ Match the power density to the medium (metal molds can withstand >30 W/cm², while static air requires <6 W/cm²). Also, always verify your supply voltage and wiring configuration (Step 4). The following sections break down dimensions, power, power density, and electrical connections in detail to avoid premature heater burnout or inefficient heating.
Whether you are selecting heating elements for injection molds, packaging sealers, or laboratory equipment, the cartridge heater selection directly determines thermal efficiency, service life, and safety. A common mistake many engineers make is focusing only on wattage and diameter while ignoring cartridge heater power density — which is the root cause of early burnout or insufficient heating speed. This article will guide you through the core parameters of cartridge heater selection and provide a ready‑to‑use calculation template.
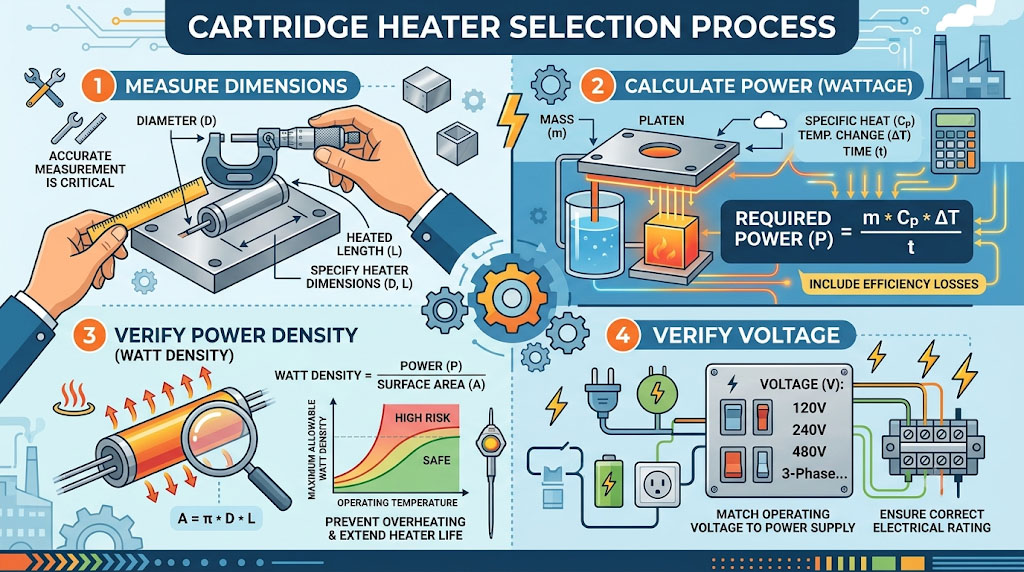
Precisely Match Cartridge Heater Dimensions – The Starting Point of Specifications
Wrong dimensions directly lead to installation difficulties or heat transfer failure. You need to measure three key data points.
Diameter Tolerance – The Key to Heat Transfer Efficiency
The cartridge heater must fit snugly against the mounting hole wall. Too much clearance causes overheating and burnout; too little makes installation impossible. Standard recommendation:
- Mounting hole diameter = Heater diameter + 0.01mm ~ 0.05mm
- Example: For a heater with a nominal diameter of 6.35mm (1/4 inch), recommended drill diameter is 6.36–6.40mm
Note: For aluminum molds (higher thermal expansion coefficient), choose a tolerance closer to the upper limit.
Heated Length vs. Overall Length – Define the Heating Zone
- Heated length (heating zone) : The area where the resistance wire is wound; heat is concentrated here. The heated length must be fully embedded inside the metal body; otherwise, exposed sections will overheat and melt.
- Overall length = Heated length + cold ends (non‑heating zones for wiring). Typically reserve 5–15mm on each end for cold ends.
Selection tip: The heated length should equal or be slightly shorter than the actual depth that needs heating in the mold, avoiding heat loss to the air.
Calculate Cartridge Heater Power – Match the Heat‑Up Requirement
Too little power, and the equipment never reaches the set temperature; too much power, and the temperature control system cycles frequently, shortening heater life. Use the following method to quickly determine reasonable power.
General Power Calculation Formula
[ P = frac{m times c times Delta T}{t times eta} ]
- m: mass of the object to be heated (kg)
- c: specific heat capacity (kJ/kg·℃), for steel ≈0.46, aluminum ≈0.88, water ≈4.2
- ΔT: target temperature rise (℃)
- t: desired heat‑up time (seconds)
- η: thermal efficiency (typically 0.7–0.9 for embedded in molds)
Example: Heat a 10kg steel mold from 20℃ to 200℃ (ΔT=180℃) within 20 minutes (1200 seconds).
( P = (10 times 0.46 times 180) / (1200 times 0.8) ≈ 8.6 , text{kW} )
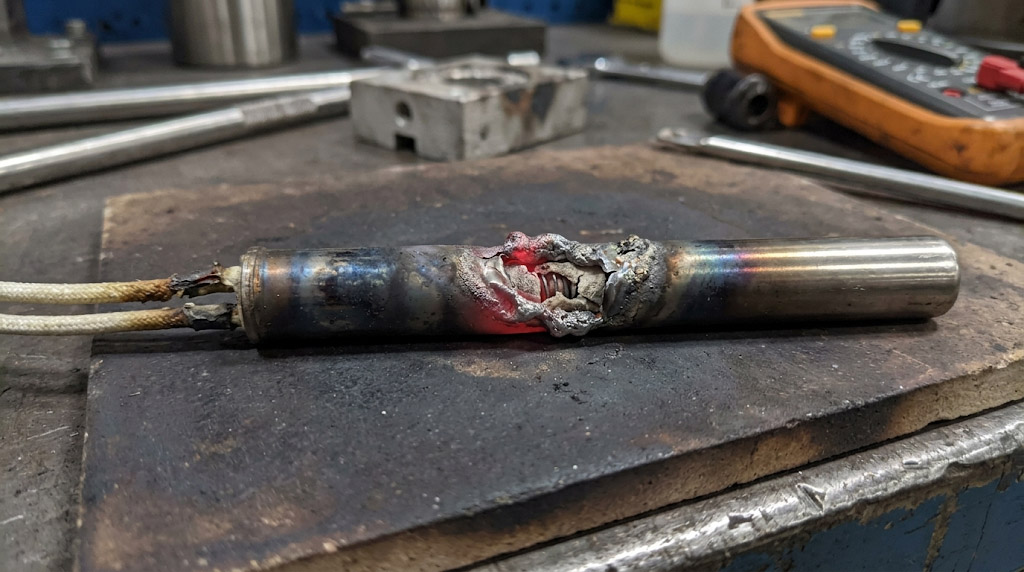
Real‑World Failure Case – Why Power Density Matters More Than You Think
⚠️ Customer case (actual incident): A manufacturer once selected a high‑power‑density cartridge heater rated at 50 W/cm² for a static air heating application. They only looked at the total wattage (500W) and diameter (10mm), ignoring the surface load. Within 3 minutes of operation in still air, the heater’s outer sheath turned red hot and melted through, causing a complete burnout and production downtime of two days.
Root cause: The maximum safe power density for static air is only 3–6 W/cm². At 50 W/cm², the internal wire temperature far exceeded the material limit.
Lesson learned: Always calculate power density against your medium before ordering. If you need 500W in static air, choose a longer or larger‑diameter heater to bring the power density below 6 W/cm².
Quick Reference Table (Common Applications)
| Application Scenario | Recommended Power Density Range (W/cm²) | Reference Power per cm³ of Mold |
|---|---|---|
| Injection molds (high flow requirement) | 15–30 | 2–4 W/cm³ |
| Hot runner systems | 20–40 | 3–5 W/cm³ |
| Liquid heating (water tank) | 8–15 | 1–2 W/cm³ |
| Static air heating | 3–6 | 0.5–1 W/cm³ |
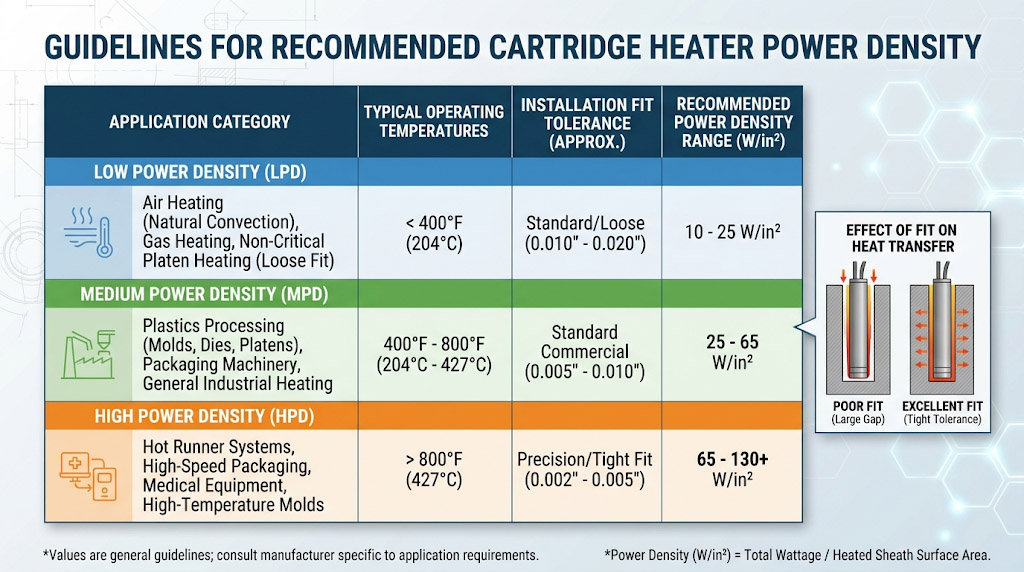
Choose Cartridge Heater Power Density – The Lifeline of Service Life & Safety
Cartridge heater power density = Power (W) / Heated zone surface area (cm²). This is the most easily overlooked yet most critical parameter in selection.
High Power Density vs. Low Power Density – Choose by Application
-
High power density cartridge heater (>15 W/cm²)
- Suitable for: metal molds, hot runners, platens, and other high heat‑transfer applications
- Advantages: fast heat‑up, compact size
- Risk: requires extremely tight fit in the mounting hole and precise temperature control (PID controller recommended)
-
Low power density cartridge heater (<8 W/cm²)
- Suitable for: air heating, plastic welding tips, liquid media
- Advantages: lower surface temperature, longer life, safer
- Limitation: larger heating volume, slower heat‑up
Maximum Allowable Power Density by Medium (Safety Red Line)
| Medium | Max Safe Power Density (W/cm²) | Failure Consequence |
|---|---|---|
| Static air | 3–6 | Surface oxidation, heating wire burn‑out |
| Flowing air | 8–12 | Can be increased moderately if uniform airflow |
| Liquid (water/oil) | 10–20 | Local vaporization, coking |
| Steel/iron mold | 25–35 | Thermal fatigue of mold, heater expansion stuck |
| Aluminum mold | 15–20 | Aluminum expands more; use conservative design |
Formula: Heated surface area = π × diameter(cm) × heated length(cm).
Example: Heater with 1.0cm diameter and 10cm heated length → area ≈31.4 cm². If power is 500W, power density ≈15.9 W/cm² (suitable for steel mold).
Verify Voltage & Wiring Configuration – A Non‑Negotiable Electrical Match
Even if your size, power, and power density are perfect, using the wrong voltage or wiring method will render the heater useless or create a fire hazard. This step is often forgotten but is just as important as the thermal calculations.
Standard Supply Voltages
Most cartridge heaters are available in common voltages:
- Low voltage: 12V, 24V (for battery‑powered or safety‑critical equipment)
- Standard single‑phase: 120V, 230V, 240V (most industrial applications)
- Three‑phase: 208V, 380V, 400V, 480V (for high‑power systems)
⚠️ Critical: A 230V heater connected to 400V will draw nearly 3 times its rated power and burn out in seconds. Conversely, a 400V heater on 230V will only produce about 33% of its rated power, resulting in slow heat‑up or never reaching temperature.
Wiring Configurations – Single, Series, or Parallel?
Cartridge heaters can have single or dual leads. Common wiring options:
| Wiring Type | Description | Voltage Effect |
|---|---|---|
| Single lead | One heating circuit, two output wires. | Apply rated voltage directly. |
| Dual lead (parallel) | Two separate heating circuits inside one tube, wired in parallel. | Same rated voltage as single version, but double the power. |
| Dual lead (series) | Two circuits connected end‑to‑end inside. | Requires double the rated voltage to achieve the same power as parallel. |
Example: A heater marked “230V / 500W” with dual leads can be wired as:
- Parallel: 230V → 500W
- Series: 460V → 500W (if your supply is 460V, order the series configuration)
Always confirm with your supplier whether the heater is pre‑wired for parallel or series, or if you need to make external connections. Miswiring will instantly destroy the heater.
How to Specify Correctly
When ordering, provide three pieces of electrical information:
- Supply voltage (e.g., 240V single‑phase)
- Required power per heater (e.g., 800W)
- Wiring preference (e.g., single lead, or dual lead with parallel connection)
If you are replacing an old heater, measure the resistance (Ohms) with a multimeter. Then use Ohm’s law:
[
P = frac{V^2}{R}
]
This tells you exactly what voltage and power the original heater was designed for.
Common Selection Mistakes & How to Avoid Them
-
Specifying only wattage, not power density
→ For the same wattage, a smaller diameter heater has higher surface power density and burns out more easily. Always calculate or clearly state power density requirements to your supplier. -
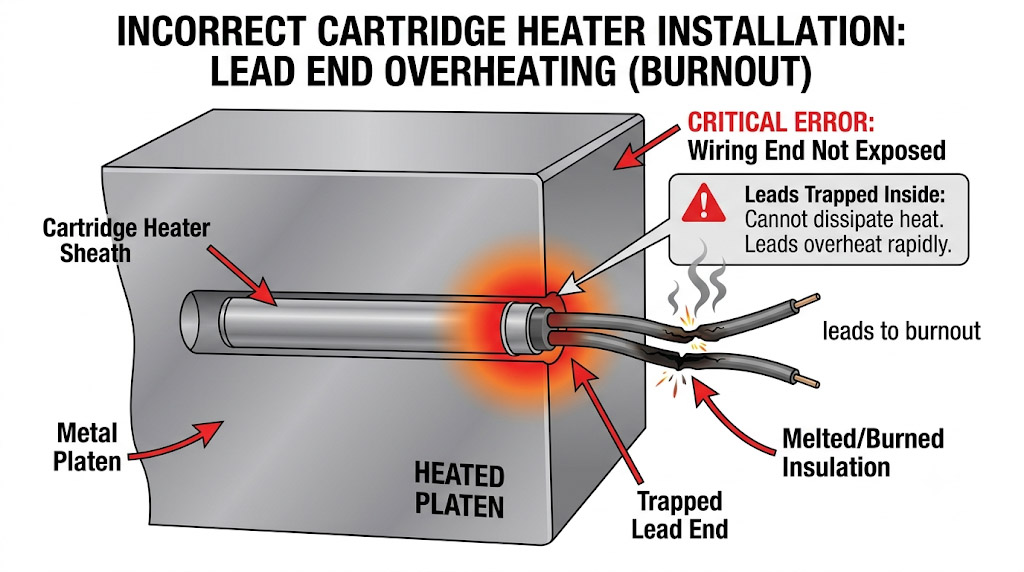
Ignoring cold end length
→ If the wiring end is also buried inside the high‑temperature mold, insulation will degrade and short circuit. Make sure the cold end remains outside the insulation layer. -
Using steel‑mold power density on aluminum molds
→ Aluminum has good thermal conductivity but higher thermal expansion. Recommended power density ≤20 W/cm² with a sliding fit (diameter clearance +0.05~0.08mm). -
Not updating for surface aging in the heating zone
→ Long‑used mounting holes may accumulate carbon or oxidation, reducing heat transfer efficiency. Regularly pull out the heater and inspect/clean the hole wall. -
Forgetting to check voltage & wiring (new addition)
→ A 120V heater on 240V will glow red and fail within minutes. Always label your equipment’s supply voltage and match it exactly.
Quick Reference – Common Cartridge Heater Specifications (For Selection Guidance)
Below are standard industrial dimensions and power combinations. Match your cartridge heater specifications directly:
| Diameter (mm) | Heated Length (mm) | Typical Power (W) | Recommended Power Density (W/cm²) | Typical Application |
|---|---|---|---|---|
| 6.35 | 25 | 100 | 20.0 | Local spot heating for small molds |
| 10.0 | 50 | 300 | 19.1 | Injection nozzles, hot runners |
| 12.7 | 100 | 800 | 20.1 | Medium molds, packaging sealers |
| 16.0 | 150 | 1500 | 19.9 | Large molds, thermal oil heating |
| 20.0 | 200 | 2500 | 19.9 | Boilers, extruder barrels |
The above are examples of moderate power density (~20 W/cm²). For high power density cartridge heaters (30–50 W/cm²), reduce diameter or shorten heated length while increasing power, and always confirm the internal wire temperature rating with your supplier.
Summary – Four‑Step Mnemonic for Cartridge Heater Selection
- Tight fit – diameter clearance ≤0.05mm, heated zone fully inside the hole.
- Power by calculation – m·c·ΔT / t / η, then check against empirical values.
- Density is the soul – choose high or low power density based on the medium, never exceed the safety limit.
- Voltage & wiring last – match supply voltage, choose correct wiring (single/series/parallel).
If you still have questions about cartridge heater specifications, power density cartridge heater calculations, or voltage and wiring, leave your operating conditions (mold material, target temperature, heat‑up time, mounting hole diameter, supply voltage) and we will provide a customized selection table. Select correctly once, enjoy peace of mind for three years.